Macroscopic photography offers photographers a unique view of the world to explore with an unlimited amount of colour, texture and physical architecture. Macro photography is a magnified photography, which is used to produce an image which is larger in the film plane (or digital sensor) than in real life. Alongside landscape photography this is what we love at chieftaintrees.
Macro Photography on a DSLR Camera
While point and shoot digital cameras may possess excellent macro capabilities, for optimal results a DSLR camera will generally out perform point and shoot. The reason for this is because DSLR cameras allow various attachments for special purpose macro lenses. An exceptional and affordable DSLR such as the Nikon D3500 is a great camera for a beginner.
Attach Appropriate Lens
Attach the appropriate lens following the manufacturer's recommendations. Some cameras have special accessories specifically with macro photography, these attachments allow the photographer to enlarge the subject and/or decrease the minimum focal length. A cheap way to start with macro photography is using extension tubes, these are a great starting point before purchasing a dedicated macro lens.
Set Camera to Macro Mode or Aperture priority
Place the camera in macro mode, oftentimes some models of cameras will not allow any other adjustments without this mode being selected. After the camera has been placed in macro mode, select a small aperture (it's a big number) for a large depth of the field which places everything into focus, or a large aperture (small number) if focusing on the main subject. In most situations, it is best to select a shallow depth of field, therefore, select the largest aperture possible. If using extension tubes you will need a wider aperture to allow in more light.
Importance of Light
Having some artificial light in macro photography is important. Fortunately most cameras come with their own built-in light meter. Choosing a time of day when there is plenty of natural light is the cheapest way of producing high quality photographs. Alternatively, the harsh light of the flash can be diffused by applying tissue paper or cello tape over the flash. Another more expensive option would be to invest in a reflector.
Focus
If the camera allows manual focus, select this option and focus the image manually. If using extension tubes, remember that the focusing distance will be very close and be prepared to compensate for this.
Take the Shot
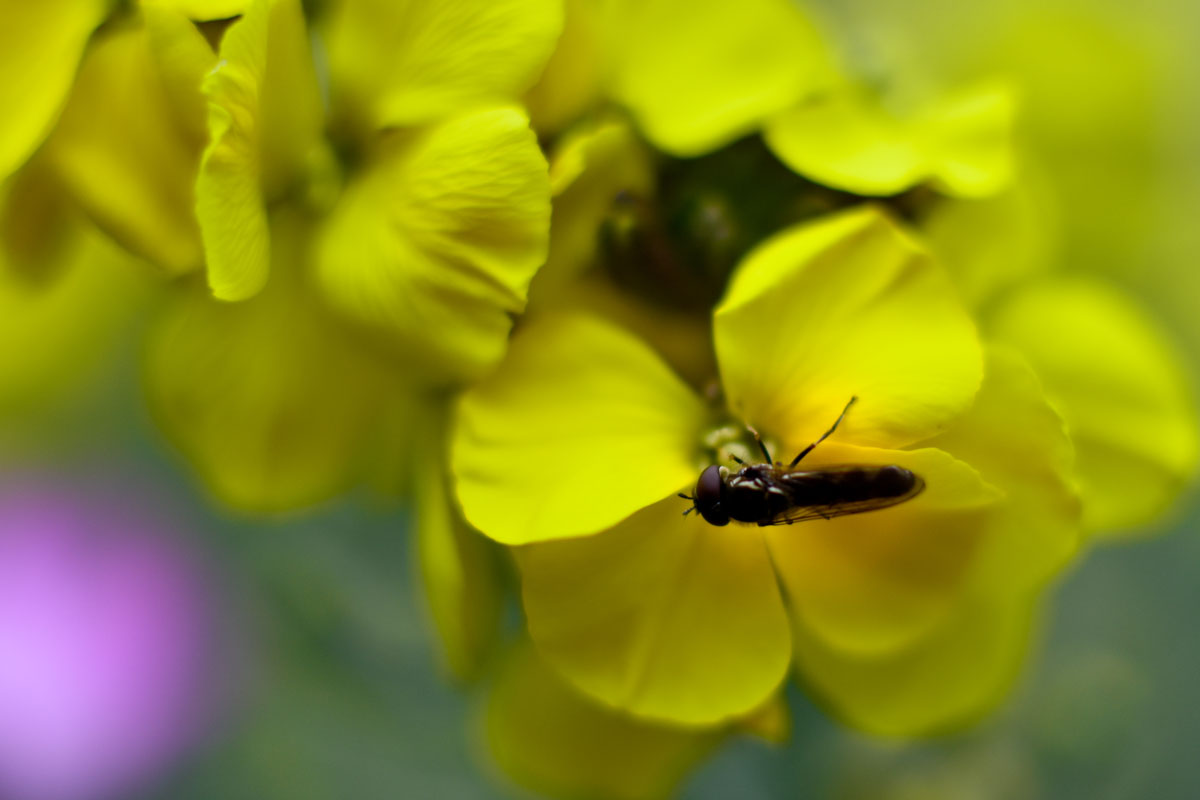
Once shot has been lined up and in focus, double check the view screen or through the eyepiece and take the shot. We recommend always shooting through the eyepiece. The image below was shot on a Nikon D3500 using extension tubes and a 36mm prime lens. As you can see, for cheap kit the result is fairly impressive.

Join the community
Chieftaintrees are selling photography as a form of donation to finance our wilding projects which we're calling 'Images to Oaks'. If you want to donate you can purchase an image here.
Alternatively if you want to provide an image to the images to oaks initiative get in touch, we're delighted to bring more photographers on board!